
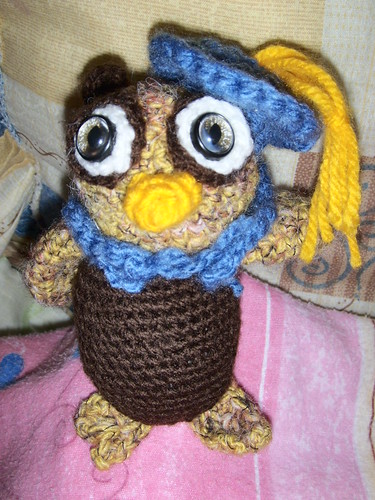
En los ratos de ocio no encuentro algo más estimulante para la imaginación que tejer, hice este buhito de graduación para mi abogado favorito.
Cuando hay que mantener las manos ocupadas mientras la mente viaja a los confines inexplorados de los sueños, nada mejor que crear cosas lindas para la gente que una ama!!!
Las instrucciones aquí:
Están en ingles pero son fáciles, para principiantes.
>>>>>>>>>>>>>>>>>>
Amigurumi Graduation Owl
Lion Brand® Vanna's Choice®
Pattern #: 80282AD
SKILL LEVEL: Easy
SIZE: One Size
About
CORRECTIONS: None
Lion Brand® Vanna's Choice®
GAUGE:
Exact gauge is not essential to this project.
STITCH EXPLANATION:
sc2tog (sc decrease) Insert hook into st and draw up a loop. Insert hook into next st and draw up a loop. Yarn over, draw through all 3 loops on hook.
NOTES:
Work in continuous rnds; do not join rnds or turn unless otherwise instructed.
HEAD
With A, ch 2.
Rnd 1: Work 6 sc in first ch. Place marker for beg of rnd; move marker up as each rnd is completed.
Rnd 2: 2 sc in each st around–12 sts.
Rnd 3: *2 sc in next st, sc in next st; rep from * around–18 sts.
Rnd 4: *2 sc in next st, sc in next 2 sts; rep from * around–24 sts.
Rnd 5: *2 sc in next st, sc in next 3 sts; rep from * around–30 sts.
Rnds 6–13: Sc in each st around.
Rnd 14: *Sc2tog, sc in next 3 sts; rep from * around–24 sts.
Rnd 15: *Sc2tog, sc in next 2 sts; rep from * around–18 sts.
Fasten off.
BODY
With B, ch 2.
Rnds 1–5: Work Rnds 1–5 of Head–30 sts.
Rnd 6: *2 sc in next st, sc in next 4 sts; rep from * around–36 sts.
Rnds 7–15: Sc in each st around.
Rnd 16: *Sc2tog, sc in next 4 sts; rep from * around–30 sts.
Rnd 17: *Sc2tog, sc in next 3 sts; rep from * around–24 sts.
Rnd 18: *Sc2tog, sc in next 2 sts; rep from * around–18 sts.
Fasten off.
OUTER EYE (make 2)
With B, ch 2.
Rnds 1–3: Work Rnds 1–3 of Head–18 sts.
Fasten off.
INNER EYE (make 2)
With C, ch 2.
Rnds 1 and 2: Work Rnds 1 and 2 of Head–12 sts.
Fasten off.
WING (make 2)
With A, ch 2.
Rnd 1: Work 4 sc in first ch. Place marker for beg of rnd; move marker up as each rnd is completed.
Rnd 2: 2 sc in each st around–8 sts.
Rnd 3: *2 sc in next st, sc in next st; rep from * around–12 sts.
Rnd 4: *2 sc in next st, sc in next 2 sts; rep from * around–16 sts.
Rnds 5–11: Sc in each st around.
Rnd 12: (Sc2tog) 8 times–8 sts.
Fasten off.
BEAK
With D, ch 2.
Rnds 1 and 2: Work Rnds 1 and 2 of Wings–8 sts.
Fasten off.
EAR (make 1)
With A, ch 2. Make as for Beak.
CAP
With E, ch 2.
Rnds 1–4: Work Rnds 1–4 of Head–24 sts.
Rnd 5: Sc in each st around.
Fasten off.
MORTARBOARD (make 2)
With E, ch 9.
Row 1: Sc in 2nd ch from hook and in each ch across–8 sts.
Rows 2–8: Ch 1, turn, sc in each st across.
Fasten off.
FEET (make 2)
With A, ch 4.
Row 1: Sc in 2nd ch from hook and in each ch across–3 sts.
Row 2: Ch 1, turn, sc in next 2 sts, 2 sc in last st–4 sts.
Row 3: Ch 1, turn, 2 sc in first st, sc in next 3 sts–5 sts.
Row 4: Ch 1, turn, sc in first 3 sts; leave remaining sts unworked–3 sts.
Fasten off.
FINISHING
Layer Inner Eyes on Outer Eyes. Following package directions insert safety eyes through center of Eyes and attach to Head. Firmly stuff Head. Stuff Beak and sew to Head. Stuff Body firmly and sew to Head. Sew Wings to sides of Body. With shaped edge at front, sew Feet to bottom of Body. With wrong sides of the 2 Mortarboards together and working through both thicknesses, join E with sl st edge and work sc evenly spaced around outside edge. Sew Mortarboard to center of Cap, then sew hat onto one side of Head, Ear to opposite side. Sew a strand of D to top of Mortarboard for tassel, fray end of strand.
Weave in ends.
ABBREVIATIONS / REFERENCES
beg = begin(s)(ning) ch(s) = chain(s)
rep = repeat(s)(ing) rnd(s) = round(s)
sc = single crochet st(s) = stitch(es)
.....
mE hice bolas en algunos pasos, pero al final quedo.
¿pRegunTaS?
...
No hay comentarios.:
Publicar un comentario